User Scenarios
OLD, NEEDS REVISION for 2.0
Needs: - Map all v1.0→v2.0 operator names, - convert panel-button instructions to keybinds, - update API references (grease_pencil.*, tool_settings.*)
Dan’s Notes
User walkthroughs and tutorials are intended to be written from these ‘use cases’, which capture functionality in a structured way. They’re just a starting-point, readability-wise, until I can get to writing friendlier guides (after testing functionality paths with these and making sure everything is recorded right, and works as intended). Tests and failure messages can also be written from these, so they are multipurpose (and therefore no good themselvles for specific needs).
The following workflows describe how to use The Violence Tool in a Fred-prepared scene.
Warning
These assume the scene already contains the correct Grease Pencil objects, materials, and layer structures.
Fred’s Tip
Before drawing, always verify:
Layer: Is the correct layer active (green)?
Tool: Is the Draw or Fill tool selected?
Material: Is the correct material selected?
The Violence Tool buttons aim to automate these three steps for you.
Future versions of the tool will more thoroughly handle setting up a scene from scratch, so for now we will leave that to Fred’s expertise.
Drawing & Layer Management
These workflows focus on setting up the correct layer, brush, and material before drawing.
Draw on a Specific Layer
Goal: Draw the next frame of the character’s body lines.
Preconditions:
A Fred-prepared scene is open.
The target layer exists and is unlocked.
Steps:
Actor moves the timeline playhead to the next frame (e.g., Frame 2). System advances the timeline.
Actor clicks the “STROKE: Body” button in the Violence Panel. System executes the layer-switching macro:
Searches all layers for the tag
"01L"inlayer.info.Locks all layers.
Unlocks the layer matching
"01L".Sets that layer as the Active Layer.
Switches to Paint Mode (
PAINT_GPENCIL).Sets the brush tool to Draw (
bpy.ops.brush.curve_preset(shape='SMOOTH')).Sets brush size to
mybrushsize(default: 13).Sets brush strength to 1.0.
Iterates material slots; assigns the first slot matching
"1 I LINE"viabpy.ops.gpencil.material_set().Pushes an undo step (
bpy.ops.ed.undo_push(message="...")).
Actor draws a stroke with the pen. System renders the stroke on the active layer using the assigned material.
Extensions:
2a. Nothing happens when clicking the button.
Issue: The operator fails silently if no Grease Pencil object is selected.
System checks for an active GP object. If none is found, the operator exits without feedback.
Actor selects the Grease Pencil object in the Outliner.
Actor clicks the button again.
2b. The wrong layer becomes active.
Issue: The tag-based search (
"01L"inlayer.info) matches the first layer containing that string. If a layer was renamed and the tag was removed or duplicated, the wrong layer may be selected.
System finds a layer with
"01L"in its info string, but it is not the intended “Body” layer.Actor notices strokes appearing on the wrong layer.
Actor checks the layer names in the Outliner for duplicate or missing tags.
Actor corrects the
layer.infostring manually or contacts Fred.
2c. The material is not assigned.
Issue: The code iterates
bpy.context.active_object.material_slotslooking for"1 I LINE"in the slot name. If the material was renamed or the slot is empty, no material is set.
System loops through slots but finds no match for
"1 I LINE".System skips the
material_set()call without warning.Actor draws, but strokes use whatever material was previously active (possibly wrong color/type).
Actor opens Material Properties, verifies the slot exists and is named correctly.
2d. Strokes appear invisible despite correct layer.
Issue: The assigned material may be set to Fill type instead of Stroke type, or its color alpha is 0.
System assigns the material slot as found.
Actor draws but sees nothing (stroke is transparent or fill-only).
Actor opens Material Properties, checks the material is set to Stroke type with visible color.
3a. Strokes appear on the wrong layer despite correct button.
Issue: The target layer is locked or hidden in the Outliner. The operator unlocks it in the GP data, but if the Outliner’s visibility override (eye icon) is off, strokes may not render.
System unlocks the layer in the GP data structure.
System does not check or toggle
layer.hidein the Outliner.Actor draws but strokes are invisible or appear on a fallback layer.
Actor opens the Outliner, finds the layer, and enables the Eye (visibility) icon.
Sculpt & Adjust Shapes
Goal: Push or pull lines to fix proportions without redrawing.
Preconditions: A Fred-prepared scene is open. Strokes exist on the target layer.
Steps:
Actor clicks the “BOTH” button for the desired part (e.g., Body). System executes the sculpt-isolation macro:
Unlocks both the Lines and Fills layers for the target part (e.g.,
"01L"and"01F").Locks all other layers.
Switches to Sculpt Mode (
SCULPT_GPENCIL).Sets the active brush to Push (
bpy.ops.brush.curve_preset(shape='SMOOTH')).Sets brush size to
mysculptsize(default: 30).Immediately switches back to Paint Mode (
PAINT_GPENCIL).Pushes an undo step.
Note: The mode switch to Sculpt and back to Paint is intentional. It prepares the Push brush so that when the actor presses
Ctrl+Tabto enter Sculpt Mode manually, the correct brush is already loaded.Actor presses Ctrl+Tab and selects Sculpt Mode. System enters Sculpt Mode with the Push brush active.
Actor uses the brush to push/pull lines (“butter-knifing”). System deforms the stroke geometry in real-time.
Actor clicks “LINES” or “FILLS” to return to drawing. System switches back to Paint Mode and resets the brush to Ink Pen.
Extensions:
1a. The brush does nothing or moves the whole object.
Issue: The actor is still in Object Mode and did not enter Sculpt Mode after clicking BOTH.
System prepared the brush but left the actor in Paint Mode.
Actor must manually enter Sculpt Mode via Ctrl+Tab → Sculpt Mode.
Actor verifies the Push brush is active in the toolbar.
3a. Strokes look distorted after sculpting.
Issue: Sculpting moves vertices in 3D space. If the camera is front-on, vertices may drift “off-plane” (gaining Z-depth), causing visual artifacts when viewed from other angles.
System records the new 3D positions of the sculpted vertices.
Actor notices the strokes look warped when rotating the view.
Actor enters Edit Mode, selects all (A), presses F3, searches for Reproject Strokes, and chooses Project from View.
System flattens all vertices back to the camera plane.
Fill Shapes with Correct Materials
Goal: Fill a closed shape with a specific color.
Preconditions: A closed loop of strokes exists on the “Lines” layer.
Steps:
Actor clicks the “FILL” button for the desired part. System executes the fill-switching macro:
Unlocks the Fills layer for the target part (e.g.,
"01F").Locks all other layers.
Sets the Fills layer as active.
Switches to Paint Mode.
Sets the brush tool to Fill (
bpy.ops.gpencil.use_tool('FILL')).Sets brush size to
myfillsize(default: 30).Iterates material slots; assigns the first slot matching the fill material pattern.
Pushes an undo step.
Actor clicks inside the closed loop. System fills the enclosed region with the active material.
Actor handles holes if needed (e.g., an ear). System requires a separate fill with a background-colored material to “punch out” the hole.
Extensions:
2a. “Unable to Fill” error message appears.
Issue: The shape is not a closed loop. The Fill tool requires a continuous boundary.
System detects a gap in the stroke boundary and reports failure.
Actor enters Edit Mode (
Tab).Actor zooms in and locates the gap.
Actor joins the vertices (J) or draws a closing stroke.
Actor returns to Paint Mode and retries the fill.
2b. Fill appears on top of lines instead of behind them.
Issue: The Fills layer is above the Lines layer in the layer stack.
System fills on the active layer regardless of stack order.
Actor opens the Grease Pencil properties and drags the Fills layer below the Lines layer.
2c. Fill doesn’t create a “donut” (fills the hole instead of leaving it empty).
Issue: Grease Pencil cannot fill a shape with an invisible hole directly.
System fills the entire enclosed region.
Actor creates a new material with the background color.
Actor fills the hole area with this background material.
System renders the hole as “cut out” against the background.
Lock/Unlock Layers for Animation
Goal: Isolate specific body parts (e.g., Mouth + Head) for animation while protecting others.
Preconditions:
A “Fox” object is active.
Layers are in a mixed locked/unlocked state.
Keybind required.
Steps:
Actor presses ``M`` (bound to
fred.op15). System executes the mouth+head unlock macro:Unlocks Mouth Lines (
"04L"), Mouth Mask ("04F"), Upper Teeth, Lower Teeth, Head Lines ("02L"), and Head Fills ("02F").Locks all other layers.
Pushes an undo step.
Actor animates the jaw and head on the unlocked layers.
Extensions:
1a. Layers remain hidden after unlocking.
Issue: The operator unlocks layers (sets
layer.lock = False) but does not check or togglelayer.hide. If layers were hidden in the Outliner, they remain invisible.
System sets
layer.lock = Falsefor the target layers.System does not set
layer.hide = False.Actor notices the layers are still invisible in the viewport.
Actor manually unhides the layers in the Outliner (click the Eye icon).
Actor re-runs the operator or proceeds manually.
Future Fix: The operator should include
layer.hide = Falsebefore unlocking.
1b. Actor only wants to animate the mouth (no head).
Issue:
fred.op15always includes head layers. There is no panel button for mouth-only.
Actor binds
fred.op14(Legacy) to a key.Actor presses the bound key.
System unlocks only Mouth Lines, Mouth Mask, Upper Teeth, and Lower Teeth.
Head layers remain locked.
1c. Actor wants to protect non-character layers before applying effects.
Actor presses
L(bound tofred.op13).System locks Background, Foreground, and Misc layers.
System leaves Body, Head, Eyes, Mouth, and Extra layers unlocked.
Actor can now safely apply noise/jitter without affecting BG/FG.
Animation & Timing
Duplicate the Previous Frame
Goal: Carry over the previous drawing to the new frame to trace or modify it.
Preconditions: A Fred-prepared scene is open. The current frame has strokes.
Steps:
Actor moves the timeline playhead to the next frame. System advances the timeline.
Actor presses ``I`` with the cursor over the Dope Sheet panel, then selects “In Active Group” (also ``I``). System duplicates the keyframe for all active, visible layers onto the new frame.
Actor verifies the previous artwork appears on the new frame. System renders the duplicated strokes.
Extensions:
2a. The duplicated frame is empty.
Issue: The previous frame had no strokes on the active layers.
System creates a keyframe but it contains no stroke data.
Actor checks the previous frame in the Dope Sheet.
Actor draws a frame manually before attempting to duplicate.
2b. Only some layers of the frame are duplicated.
Issue: “In Active Group” only copies layers that are currently unlocked and visible.
System duplicates only the keyframe data for layers that are active and visible at the time of the
Ikey press.Actor ensures all desired layers are unlocked and visible before pressing
I.Alternatively, Actor uses the “All Layers” option in the
Ikey menu.
Line Art Polish & Effects
Apply Organic Jitter to Lines
Goal: Make clean vector lines look more hand-drawn and organic by applying a static, destructive noise effect.
Preconditions:
A Grease Pencil object with the standard “Fox” layer structure is active.
The animator has drawn strokes on one or more layers.
Layers intended for texturing are unlocked. Layers not intended for texturing are locked.
Keybind Required (Alt-R suggested)
Steps:
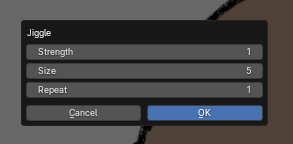
Actor presses ``Alt-R`` (bound to
fred.op8). System executes:Opens a custom dialog window titled “FRED: Jiggle”.
Displays three integer properties: Strength (default 1, max 1000), Size (default 5, max 50), and Repeat (default 1, max 10).
Waits for Actor to adjust values and click OK or Cancel.
Starting amount suggestions: Strength: 50, Size: 50, Repeat: 1 (repeat is how many times to repeat the operation, usually 1)
Actor adjusts sliders (e.g., Strength 5, Size 5, Repeat 1) and clicks OK. System executes the noise loop:
Enters Edit Mode (
EDIT_GPENCIL).Selects all strokes on the active layer.
- Iterates
Repeattimes: Calculates a random noise offset:
random.uniform(-0.0001, 0.0001) * (1 + int(Strength/8)).Calculates a brush radius:
int(1 + int(Size/2)).Applies the noise offset to 99.5% of the vertices (randomly deselects 0.5%).
Adjusts stroke thickness based on the calculated radius.
- Iterates
Exits Edit Mode and returns to Paint Mode.
Pushes a single undo step (
bpy.ops.ed.undo_push(message="Jiggle Applied")).
Actor inspects the result. System renders the modified strokes.
Actor presses ``Ctrl+Z`` if the effect is too strong. System reverts the strokes to their pre-jitter state.
Extensions:
- 1a. Actor presses
L(bound tofred.op13) to lock non-character layers. System locks Background, Foreground, and Misc layers. System leaves character layers unlocked for jittering.
2a. No change occurs after clicking OK.
Issue: The target layer is locked.
System checks
layer.lockfor the active layer. IfTrue, the operator skips the modification loop.System does not display a warning message.
Actor notices no change.
Actor opens the Outliner, finds the layer, and disables the Lock (padlock) icon.
Actor retries the operator.
2b. The effect is too subtle or too chaotic.
Issue: The Strength or Repeat values were set too low or too high.
System applies the calculated noise.
Actor observes the result.
Actor presses ``Ctrl+Z`` to undo.
Actor re-runs the operator with adjusted values.
2c. The file size increases drastically.
Issue: The noise algorithm may subdivide strokes or increase vertex count slightly.
System modifies the stroke data.
Actor notices the file size growing or playback lagging.
Actor runs Adaptive (F3 → Simplify Stroke) to reduce vertex count.
Optimize Strokes (Reduce File Size)
Goal: Reduce file size by removing unnecessary vertices while preserving shape.
Preconditions: A heavy animation file is open. Strokes exist.
Steps:
Actor enters Edit Mode (
Ctrl+Tab). System switches to Edit Mode.Actor selects all strokes (
A). System highlights all vertices.Actor presses ``F3`` and searches for “Adaptive” (Simplify Stroke). System opens the “Simplify Stroke” dialog.
Actor sets the Threshold to 0.001 (or 0.0001) and presses Enter. System executes:
Iterates through all selected strokes.
Removes vertices where the deviation from the curve is less than the threshold.
Preserves the overall shape.
Pushes an undo step.
Actor verifies the file size reduction and playback smoothness.
Extensions:
1a. The “Adaptive” tool is not found in F3 search.
Issue: The actor is not in Edit Mode. The tool is only available in Edit Mode.
System hides the operator from the search menu if the context is not Edit Mode.
Actor presses ``Ctrl+Tab`` to enter Edit Mode.
Actor retries the search.
3a. The lines look jagged or lose their shape.
Issue: The Threshold value is too high (e.g., 0.1).
System aggressively removes vertices, distorting the curve.
Actor notices jagged edges.
Actor presses ``Ctrl+Z``.
Actor retries with a smaller threshold (e.g., 0.001).
3b. The operation freezes Blender.
Issue: Too many frames are selected simultaneously without Multi-Frame Editing enabled.
System attempts to process thousands of frames at once.
System consumes excessive memory/CPU.
Actor enables Multi-Frame Editing in the Dope Sheet header.
Actor selects all frames and retries, or processes in smaller batches.
Global Color Change via Materials
Goal: Change the color of a character’s jacket from Green to Red across all frames instantly.
Preconditions: The character uses a specific Material Slot (e.g., “Jacket_Green”) for the fill.
Steps:
Actor opens the Material Properties tab for the Grease Pencil object. System displays the list of material slots.
Actor finds the “Jacket_Green” slot and changes the Base Color to Red. System updates the material data block.
Actor plays the animation. System renders all frames using the updated material.
Extensions:
2a. The color change updates EVERY frame.
Issue: The material slot is Shared across all keyframes. This is the default behavior.
System applies the color change to the single material data block used by all frames.
Actor sees the change globally.
Actor decides to change only one frame.
Actor clicks the “New” button (shield icon) next to the material name to create a Unique Copy.
Actor changes the color of the unique copy.
System applies the new color only to the current frame.
2b. The color change does not appear on screen.
Issue: The viewport is in Solid View mode, which may cache colors.
System updates the material but the viewport renderer does not refresh immediately.
Actor presses ``Z`` and switches to Rendered or Material Preview mode.
System refreshes the viewport.
Viewport & Display Controls
Toggle Viewport Compositor
Goal: Instantly toggle the viewport compositor (e.g., to check flat colors vs. lit colors).
Preconditions: A Grease Pencil object is selected. The 3D Viewport is active.
Steps:
Actor presses ``F7`` (bound to
fred.op39). System executes:Iterates through all areas in the current window.
Finds the area where
area.type == 'VIEW_3D'.Iterates spaces in that area.
Finds the space where
space.type == 'VIEW_3D'.Checks
space.shading.use_compositor.If
'DISABLED', sets it to'ALWAYS'.If
'ALWAYS', sets it to'DISABLED'.Pushes an undo step.
Actor sees the change (e.g., lighting disappears, revealing flat colors).
Extensions:
1a. Actor wants to disable lights on the object specifically.
Actor presses ``F6`` (bound to
fred.op37).System sets
layer.use_lights = Falsefor all layers of the selected object.System renders the object with flat colors regardless of scene lights.
BUG: The operator crashes on the second click.
Issue: The operator defines a nested class
VIEW3D_OT_toggle_viewport_compositorinside the function and callsregister()every time.
System attempts to register the class again.
System raises a
RuntimeError: register_class(...): already registered as bpy struct.System may crash or freeze the viewport.
Actor must restart Blender or reload the addon to recover.
Actor avoids clicking the button twice in rapid succession.
Future Fix: Inline the logic without registering a nested class.
Setup & Utilities
Create a New Rig
This only creates a ‘Fox’ GP object, for now. OP25 replaces OP11, which only creates 1 layer and 1 material.
Goal: Create a new Grease Pencil object pre-configured with the correct layers, materials, and brushes.
Preconditions: - The addon is installed and enabled. - No Grease Pencil object is currently selected. - fred.op25 is assigned to a key.
Steps:
Actor presses ``F5`` (bound to
fred.op25). System executes:Creates a new Grease Pencil data-block named “ANIM_FOX”.
Creates a new object and links the data.
Generates 18 layers (Body, Head, Eyes, Mouth, etc.).
Creates 20+ material slots (1 I LINE, B HOLDOUT, etc.) and assigns them.
Sets up custom brush presets.
Makes the new object active.
Actor may drawing immediately.
Hide/Show Active Layer
Goal: Quickly hide the current layer to see what’s underneath.
Preconditions: A layer is active.
Steps:
Actor presses ``H`` (bound to
fred.op40). System executes:Identifies the active layer.
Toggles
layer.hide(True ↔ False).Pushes an undo step.
Actor sees the layer disappear or reappear.
Utility Tools
Hold-to-Activate Automerge
Goal: Temporarily enable stroke merging while drawing, then disable it upon release.
Preconditions: The actor is in Paint Mode.
Setup: Bind ``A`` (Press) to fred.op16 and ``A`` (Release) to fred.op17 in Grease Pencil → Stroke Paint Mode.
Steps:
Actor holds down ``A``. System executes
fred.op16:Sets
context.scene.gpencil_settings.use_gpencil_automerge_strokes = True.Pushes an undo step.
Actor draws strokes. System merges new strokes with existing ones automatically.
Actor releases ``A``. System executes
fred.op17:Sets
context.scene.gpencil_settings.use_gpencil_automerge_strokes = False.Pushes an undo step.
Actor resumes normal drawing (no merging).
Extensions:
1a. Merging does not occur while holding.
Issue: The keybind is in the wrong context (e.g., 3D View Global instead of Paint Mode).
System ignores the key press because the context is wrong.
Actor re-binds the key in Grease Pencil → Stroke Paint Mode.
Hold-to-Activate Draw Behind
Goal: Temporarily draw new strokes behind existing ones while holding a key.
Preconditions: The actor is in Paint Mode.
Setup: Bind ``D`` (Press) to fred.op21 and ``D`` (Release) to fred.op22 in Grease Pencil → Stroke Paint Mode.
Steps:
Actor holds down ``D``. System executes
fred.op21:Sets
context.scene.gpencil_settings.use_draw_behind = True.Pushes an undo step.
Actor draws strokes. System places new strokes behind existing ones.
Actor releases ``D``. System executes
fred.op22:Sets
context.scene.gpencil_settings.use_draw_behind = False.Pushes an undo step.
Actor resumes normal drawing (strokes on top).
Swap Brushes Quickly
Goal: Instantly switch to specific custom brushes without opening menus.
Preconditions: The actor is in Paint Mode.
Setup: Bind keys to fred.op9 (Eraser Point), fred.op10 (Eraser Stroke), fred.op28 (01 PEN), fred.op29 (01 PEN STRENGTH P).
Steps:
Actor presses the bound key (e.g., ``1`` for Eraser Point). System executes:
Sets the active brush to the specified preset.
Pushes an undo step.
Actor draws with the new brush.
Extensions:
1a. The brush does not change.
Issue: The custom brush preset does not exist in the file.
System attempts to set the brush but fails silently or falls back to default.
Actor checks the Brush tab in the Properties panel to verify the preset exists.
Actor creates the missing brush preset manually.
Toggle Fill Brush Modes
Goal: Switch the Fill brush between Control (points only) and Both (strokes + points).
Preconditions: The actor is in Paint Mode.
Setup: Bind ``F`` to fred.op34 (Control) and ``G`` to fred.op35 (Both).
Steps:
Actor presses ``F`` or ``G``. System executes:
Sets
context.scene.gpencil_settings.fill_modetoCONTROLorBOTH.Pushes an undo step.
Actor fills shapes with the new mode.
Extensions:
1a. The fill mode does not change.
Issue: The actor is not in Paint Mode or the context is wrong.
System ignores the command.
Actor ensures they are in Paint Mode.
Toggle Stroke Strength
Goal: Instantly set stroke strength to 0% (invisible) or 100% (opaque).
Preconditions: The actor is in Paint Mode.
Setup: Bind ``0`` to fred.op1 (0%) and ``9`` to fred.op2 (100%).
Steps:
Actor presses ``0`` or ``9``. System executes:
Sets
context.scene.gpencil_settings.stroke_strengthto 0.0 or 1.0.Pushes an undo step.
Actor draws with the new strength.
Extensions:
1a. Strokes remain visible/invisible.
Issue: The actor is drawing on a layer with a material that overrides the global strength.
System sets the global strength, but the material’s alpha overrides it.
Actor checks the Material Properties for the active slot.
Actor adjusts the material’s alpha if needed.