Blender Basics for Animators
Note
New to Blender? If you have never used Blender before, you can still use the tool. Grease Pencil is a unique feature within Blender, and not the worst place to start. As a 3D program though, Blender has its own ways of handling navigation and shortcuts. This page covers the navigation, shortcuts, and Blender concepts you need to use Fred’s plugin Tool and Blender’s Grease Pencil mode together.
If you are already comfortable with Blender, you can safely skip this page and head to Installation & Setup.
This guide is adapted in part from Fred’s “Blender Crash Course” for animators, which you can watch below. You can consider this page much briefer notes for reference.
Blender is a huge program. In some ways, there’s no reason to wait until you ‘know enough’ about a tool like Blender. Everyone has to start somewhere.
The following is all the parts of Blender that is relevant to Grease Pencil. Some of this carries over to other work in Blender. When learning Blender, or any very complicated program, it’s good to have a goal (like this!) in mind as you work, or you could lose yourself in learning how to do things in it you’ll never even use. Few can do _everything_ in Blender.
Viewport Navigation
Before drawing, you need to know how to move around the scene. Generally, you will be locked into a plane for most things in Grease Pencil, but you’ll still need to ‘navigate’.
Orbit (Rotate View): Hold Middle Mouse Button and drag. (See #Orbit)
Pan (Move View): Hold Shift + Middle Mouse Button and drag. (See #Pan)
Zoom: Hold Ctrl + Middle Mouse Button and drag up/down. (See #Zoom In/Out)
Strafe (Move Sideways): Hold Alt + Middle Mouse Button and drag. (See #’Dolly’ View)
Toggle Perspective/Orthographic: Press Numpad 5. (See Perspective/Orthographic) Orthographic is essential for reference sheets (no distortion).
Frame Selected: Press Numpad . (Period) to zoom in on a selected object. (See #Frame Selected)
View All: Press Home to fit everything in the view. (See #Frame All)
Camera View: Press Numpad 0 to see exactly what the render will look like. (See Camera View)
Shading Modes: Press Z to cycle between Wireframe, Solid, Material Preview, and Rendered. (See Viewport Shading)
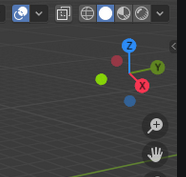
Figure 1: The multi-coloured navigation gizmo in the top-right corner. Shading modes can be seen above it.
Manipulating Objects
These are the three most important keys for moving, rotating, and scaling objects.
G (Grab/Move): Select an object, press
G, and move the mouse to move it. Be careful with this when the camera view is locked to a plane, use:Lock Axis: Press
X,Y, orZafterGto move along a specific axis.Numeric Input: Press
Gthen immediately type a number (e.g., 5) andEnterto move exactly X units.
R (Rotate): Select an object, press
Rand move the mouse to rotate.Lock Axis: Press
X,Y, orZafterRto move along a specific axis.
S (Scale): Press
Sand move the mouse to resize.Lock Axis: Press
X,Y, orZafterSto move along a specific axis.
Tip
Locking the axis, numeric input and free-axis all work for Grab, Rotate and Scale, but these are the most likely combinations you’ll find yourself using for Grease Pencil.
Other useful commands:
Cancel: Press
Right Mouse Buttonto cancel the action and return to the original position.Confirm: Press
Left Mouse Buttonto confirm the change.Fine Tune: Hold
Shiftwhile moving/scaling for slower, more precise adjustments.Grid Snap: Hold
Ctrlwhile moving to snap to the grid.Reset: Press
Alt+G(Location),Alt+R(Rotation), orAlt+S(Scale) to reset to default.
Object Modes
Understanding the difference between modes is critical.
Object Mode: You manipulate the object as a whole. (See Object Mode)
Edit Mode: You manipulate the geometry inside the object. In the context of GP, these are the points (vertex) that make up each stroke. This is the same as in vector layers in art programs. (See Edit Mode)
Draw Mode: Use this mode for accessing and using brushes. Switching is generally handled by Fred’s Tool, but it is helpful to understand what it is doing. (See Draw Mode)
Press Tab to toggle between modes.
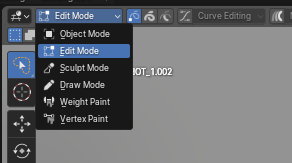
Figure 2: Location of Object Mode, Edit Mode, and Draw mode, top left
Basics Next Steps
Keyboard Shortcuts Reference: Recommended shortcuts and suggested keybinds
AFIS Workflow Guide: AFIS Workflow instruction