Keybinds List
This document covers Rex’s community-default keymap. Fred also maintains a personal alternative you can request, specifically for avoiding breaking the middle-mouse-button if you find that seems to happen to you (few people use theirs harder than he does).
Warning
All keybinds here assume the Violence Tool addon is enabled and the keymap is properly imported. If keys don’t respond, see Importing the Keymap for re-import instructions or Keybinds & Shortcuts Not Working.
The Violence Tool consists of two components intended to be used together:
- Fred’s Layer Manager
— is a Blender script that defines “operators” and how they affect Blender’s tools and interface. See Installing the Addon
- Community Keybinds
— binds keys to Fred’s custom operators and to the native Blender operators.
Note
The “Operators” listed here in the last two columns are for reference if you’re building your own keymap from scratch. Rex’s keymap binds all of them. If you’re using Rex’s keymap, you can ignore those — it’s here for reference and for users who want to assign different keys.
Keybind Context & Blender Modes
In Blender, a keybind is only active when two conditions are met:
Cursor Location: The mouse cursor must be inside the 3D Viewport or specific Editor for non-3D commands.
Active Mode: The Grease Pencil object must be in the required Mode: Draw, Edit, Sculpt, or Object.
Most of Fred’s workflow assumes you are working in 3D Viewport > Draw Mode. However, certain editing tools require Edit Mode, and nudge tools require Sculpt Mode. But! The Violence Tool’s operations are designed to automatically switch modes for you.
Already-existing Hotkeys (Blender native)
These keys are set by default in Blender natively and are useful to the workflow.
Shortcut |
Action |
Context |
Blender Operator ID |
Keymap Section Path |
|---|---|---|---|---|
|
Search Operators |
Any Mode |
|
Window |
|
Open Mode Menu (Draw/Edit/Sculpt/etc.) |
Any Mode |
|
Window |
|
Toggle Edit Mode |
Any Mode |
|
Window |
|
Zoom 2D View (i.e. menus and Areas) |
Any Mode |
|
2D View |
|
Toggle Viewport Shading |
3D Viewport |
|
3D View → 3D Viewport |
|
Toggle X-Ray Mode |
3D Viewport |
|
3D View → 3D Viewport |
|
Reset Camera View |
3D Viewport |
|
3D View → 3D Viewport |
|
Insert Keyframe |
Timeline / Dope Sheet |
|
Timeline / Dope Sheet |
|
Hide Gizmos |
3D Viewport |
||
|
Select Stroke |
3D Viewport / Edit Mode |
||
|
Smooth stroke (while drawing) |
3D Viewport / Draw Mode |
Hotkeys that you may want to know
Efficient animation with The Violence Tool relies on a combination of tool-specific shortcuts and standard Blender navigation. Most animators will only need to set up the keys listed in this section — Fred provides a keymap file so you don’t have to bind each one manually.
About Rex’s Keymap vs. Fred’s Personal Keymap
Two keymap files are available from the community. Check out the pins in the Discord #GreasePencil channel. The main difference is the use of the MMB:
Fred’s Tip
“I would rather people use [a] keymap and change them from there. Even if people don’t like [the] setup, it would be easier to change what they don’t like about [it], than starting vanilla and having to enter all the script keymaps [in] use.”
Dan’s Tip
Definitely recommended. Initially, I set them up one by one - it takes a very long time. Instead, I’ve listed below what the keymapping entails and note any other differences. I’ll make an editable .md version you can use if you make changes and want that as a reference on-hand. That’ll be pinned in the GP channel too. Feel free to share your own differences with the community if you find a change feels good - could be useful!
Note
Since the tool requires a lot of unique keybinds, it can be helpful to have a separate installation of Blender for different projects, particularly if you have a lot of addons - or, have different keybind files you can switch between.
Different blender versions are easily installed in parallel (either by Portable exes or .tar.xz), so one won’t interfere with your other potential Blender projects or experiments as long as they’re different versions. Handy if you have the space!
Binding Operators to Keys
The Keymap Section Path column tells you exactly where to navigate in Edit > Preferences > Keymap to add a new binding.
Step-by-Step Binding
Go to Edit > Preferences > Keymap.
On the left tree, expand the section listed in the Keymap Section Path column.
Example: For
3D View → 3D View (Global), expand 3D View, then 3D View (Global).
Scroll to the bottom of that section.
Click the “+ Add New” button.
In the new row:
Left field (Operator): Type the Operator ID (e.g.,
gpencil.draw_mode).Right field (Event): Click and press your desired key (e.g.,
D).
For Hold-to-Activate keys (marked with “(Press)” and “(Release)”):
Add two bindings for the same key.
First binding: Set Event Type to ``Press``.
Second binding: Set Event Type to ``Release``.
Click Save Preferences at the bottom.
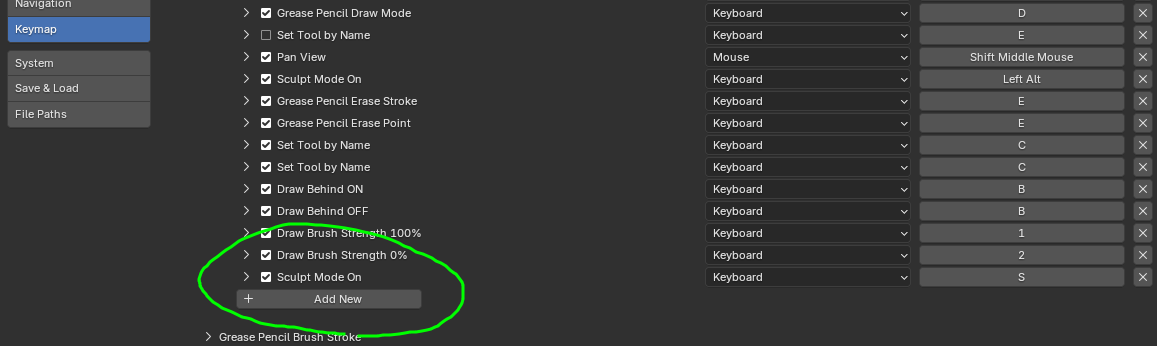
I’ve included screenshots of the UI so that you can make sure your settings match visually as well. This
might be a bit tough to navigate the first time, but you’ll get a sense for how keybinding works in Blender, and that can be really powerful knowledge to take to other projects as well!*
Warning
The tool needs to be fully installed as an addon, not just ‘run’ from the console, though that will work temporarily. Make sure you’ve gone to Edit > Preferences > Addons and imported it.
Save your preferences after setting keybinds. If you close Blender without saving, all keymap changes are lost.
Setting Up Hold-to-Activate Keys (Modal)
Some tools (like Automerge, Draw Behind, or Sculpt Mode) are designed to work only while you hold a key down. To set this up in Blender:
Open Keymap Preferences
Go to Edit > Preferences > Keymap.
Locate the Operator
In the search bar at the top, type the operator name (e.g.,
gp.auto_merge_on). * Tip: If you don’t see it, ensure the addon is enabled and you are searching in the correct category (usually 3D Viewport or Grease Pencil Paint Mode).
Add a New Binding
Click the + (plus) icon next to the operator name to add a new keybinding.
Configure the “Press” Event
Key: Click the key field and press the key you want to use (e.g.,
A).Event Type: Change this from
Anyto ``Press``.This ensures the action starts when you push the key down.
Add the “Release” Binding
Click the + icon again to add a second binding for the same operator.
Key: Press the same key (e.g.,
A).Event Type: Change this to ``Release``.
This ensures the action stops when you let go of the key.
Verify Context
Ensure the Context column matches your workflow (e.g., 3D Viewport or Grease Pencil Paint Mode).
Fred’s Tip
If you forget a shortcut, hit F3 and type the function name. It shows you the shortcut and lets you search for it.
Core Workflow Keybinds
These are the primary keybinds you’ll use constantly during animation work.
Layer Switching
These are the core of The Violence Tool. Each key combination calls the same parameterized
operator with different layer_filter and material_filter values, allowing instant switching
between drawing contexts without navigating or clicking through menus.
Important: Many of these operators automatically force the object into Draw Mode regardless of the current mode. That’s the point!
Shortcut |
Action |
Context |
Operator ID |
Keymap Section Path |
|---|---|---|---|---|
|
Switch to Line layer + Draw Tool |
3D View → 3D View (Global) |
|
3D View → 3D View (Global) |
|
Switch to Fill layer + Fill Tool |
3D View → 3D View (Global) |
|
3D View → 3D View (Global) |
|
Switch to Sculpt context (unlocks layers) |
3D View → 3D View (Global) |
|
3D View → 3D View (Global) |
|
Switch to Mouth Lines layer |
3D View → 3D View (Global) |
|
3D View → 3D View (Global) |
|
Switch to Mouth Mask layer (Fill Tool) |
3D View → 3D View (Global) |
|
3D View → 3D View (Global) |
|
Switch to Upper Teeth layer |
3D View → 3D View (Global) |
|
3D View → 3D View (Global) |
|
Switch to Lower Teeth/Tongue layer |
3D View → 3D View (Global) |
|
3D View → 3D View (Global) |
|
Switch to Shadows layer |
3D View → 3D View (Global) |
|
Grease Pencil → Edit Mode |
|
Switch to Highlights layer |
3D View → 3D View (Global) |
|
Grease Pencil → Edit Mode |
|
Toggle Fade Inactive Layers Overlay |
3D Viewport > Any Mode |
|
Window |
|
Switch to Sculpt Mode |
Any Mode |
|
Window |
|
Isolate Visibility |
3D Viewport > Draw/Edit Mode |
About the S Key
The S key provides an alternative to Alt-hold for entering Sculpt Mode:
S (press) → Enters Sculpt Mode and stays there (no automatic return)
Use this when you want to do extended sculpting work without holding a modifier
To exit, press Tab (return to Edit Mode) or use the mode pie menu (Ctrl+Tab)
Be sure you’re on the right, unlocked layer. * you may need to have the properties tab area open. Not sure.
Note
Although the Context is listed as “Any Mode,” Fred’s script executes bpy.ops.object.mode_set(mode='PAINT_GREASE_PENCIL')
before running these operators. Therefore, they are safe to press even if you are stuck in Object or Edit Mode—they
will return you to Draw Mode automatically.
Dan’s Tip
This is also handy to ‘reset’ things if you’re lost! Just hit Ctrl-1 and you know exactly what layers are on and locked, no matter how much you fiddled with things.
A technical note
In v2.0, the old individually-named operators (fred.body_lines, fred.sculpt1, etc.)
have been consolidated into a single ‘parameterized operator’ that accepts layer_filter
and material_filter properties. Each keybind (e.g., Shift+1) calls the same ‘operator (OP)’
with different filter values. See Operator Inventory for technical details.
Fred’s Tip
The layer_filter is a ‘substring’ match, not an exact match. As long as your layer name
contains the filter string somewhere, the operator will find it. For example, a filter of
01L will match 01L Body Lines, Layer 01L, or anything containing 01L.
Same goes for material_filter. This means you can rename your layers descriptively
without breaking your keybinds.
Mouth Layer Numbering
The mouth uses four dedicated layers (Ctrl 1-4), always kept together in the timeline:
Ctrl 1 — Mouth Lines: Intended for the main mouth shape/muzzle, and nose.
- Ctrl 2 — Mouth Mask: An invisible fill layer (alpha set to 0) that acts as a **clipping
mask** for teeth, tongue, and throat. Anything drawn on Ctrl 3 or 4 (lower jaw layers) only shows where this mask exists.
Ctrl 3 — Upper Teeth: Upper teeth only (these don’t move with the jaw, and should be considered part
of the skull/head).
Ctrl 4 — Lower Teeth / Tongue / Throat: Everything in the mouth that moves — lower teeth (the default
material), tongue, and throat.
About Ctrl+2 (Mouth Mask)
Unlike other fill layers (Alt+Shift) that call fill_switch (opens material menu), Ctrl+2 uses
fill_specific_switch, which sets a predetermined material slot without opening the popup. This is
optimized for the mouth mask workflow.
See AFIS Workflow Guide for the full mouth drawing workflow.
Modal Toggles (Hold-to-Activate)
These keys use press/release bindings. See Setting Up Hold-to-Activate Keys above for setup instructions.
Fred’s Tip
“You MUST hold the toggle key down BEFORE you start drawing, and you MUST wait until you lift your pen up from drawing before you let go of the key. If you let go of the press/release toggle for anything while you’re still drawing or erasing a stroke, the toggle will ‘hang’ because Blender doesn’t register press/releases in the middle of drawing a stroke.”
If a toggle gets stuck enabled, just lift your pen and tap the toggle key once. See Modal Toggles Getting Stuck in Troubleshooting.
This applies to all three hold-to-activate keys: A (automerge), B (draw behind),
and Alt (sculpt mode).
Shortcut |
Action |
Context |
Operator ID |
Keymap Section Path |
|---|---|---|---|---|
|
Enable Automerge |
3D Viewport > Draw Mode |
|
Grease Pencil → Paint Mode |
|
Disable Automerge |
3D Viewport > Draw Mode |
|
Grease Pencil → Paint Mode |
|
Enable Draw Behind |
3D Viewport > Draw Mode |
|
Grease Pencil → Paint Mode |
|
Disable Draw Behind |
3D Viewport > Draw Mode |
|
Grease Pencil → Paint Mode |
|
Enter Sculpt Mode temporarily |
3D Viewport > Draw Mode |
|
Grease Pencil → Paint Mode |
|
Return to Draw Mode |
3D Viewport > Sculpt Mode |
|
Grease Pencil → Paint Mode |
While in sculpt mode via Alt, press F to change brush size.
If you see gray edit lines while nudging → “selected only” is ON.
Note
The Alt sculpt toggle may look jarring when switching back and forth, but this is a Blender limitation —
there is no smoother way to handle modal mode switching. Holding Alt literally switches to sculpt
mode while you hold it.
Drawing & Erasing
Shortcut |
Action |
Context |
Operator ID |
Keymap Section Path |
|---|---|---|---|---|
|
Switch to Draw Mode + “MY STROKE” brush |
3D Viewport > Any Mode |
|
3D View → 3D View (Global) |
|
Switch to Erase Point brush |
3D Viewport > Draw Mode |
|
Grease Pencil → Paint Mode |
|
Switch to Erase Stroke brush (full stroke erase) |
3D Viewport > Draw Mode |
|
Grease Pencil → Paint Mode |
|
Delete all connected strokes/fills of selection |
3D Viewport > Edit Mode |
|
Grease Pencil → Edit Mode |
|
Brush strength 100% |
Grease Pencil > Paint Mode |
|
Grease Pencil → Edit Mode |
|
Brush strength 0% |
Grease Pencil > Paint Mode |
|
Grease Pencil → Edit Mode |
Warning
Context Matters for Erasure:
Ctrl-X requires Edit Mode. If you press it in Draw Mode, it may do nothing.
Fred’s script gpencil.erase_all_of_selected includes a poll check:
if bpy.ops.grease_pencil.select_linked.poll():.
E Key Mechanics: Unlike typical hold-to-activate keys, E uses press/release bindings:
Press E down → activates full-stroke eraser
Release E → switches to point eraser
Pressing E once switches to the eraser tool. Holding E down switches to the full-stroke eraser — touching any part of a stroke deletes the entire connected stroke. This makes use of two different Blender GP brushes (with eraser properties) set up in a specific way:
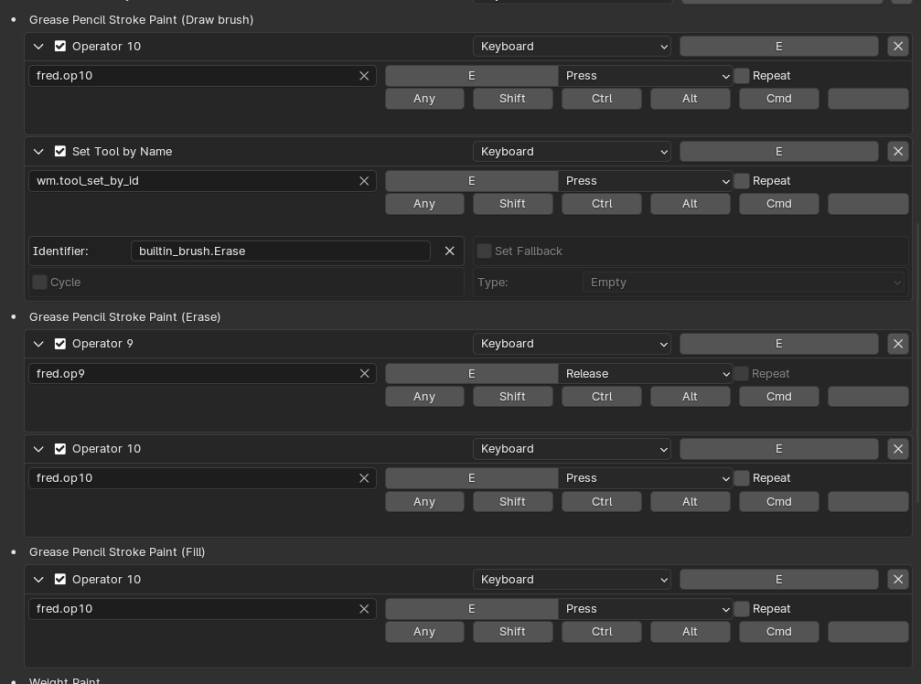
So holding E keeps you in full-stroke erase mode. When you let go, you’re left on point eraser. If you want to stay on full-stroke erase after releasing, tap E twice quickly (press-release, press-release).
Note
In Blender 5.2 LTS, the “Default Eraser” setting was removed. The last activated eraser brush is
now used automatically. The tool’s two eraser operators gpencil.erase_stroke and
gpencil.erase_point set the specific eraser brush before switching to erase mode. It’s a
strictly technical change.
Quick Menus
These bare number keys (no modifier) open popup menus at your cursor for quick access without reaching for the N-panel or other Blender panels/tools.
Shortcut |
Action |
Context |
Operator ID |
Keymap Section Path |
|---|---|---|---|---|
|
Open Change Active Layer (popup) |
3D Viewport > Draw Mode |
|
Grease Pencil → Stroke Paint Mode |
|
Open Material Menu (popup) |
3D Viewport > Any Mode |
|
3D View → 3D View (Global) |
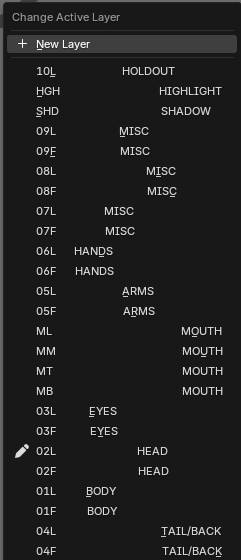
The (Change Active) Layer Menu shows available layer-switch operators.
Opens a popup listing all layers in the active Grease Pencil object. Select one to make it the active drawing
layer. This is a native Blender operator (grease_pencil.layer_set_active) that has no default keybind —
Rex’s keymap assigns it to 3. It makes the most sense in Draw Mode but is available in other contexts.
The Material Menu shows the active Grease Pencil object’s material slots.
Opens the material slot popup (native VIEW3D_MT_greasepencil_material_active) so you can quickly switch
which material you’re drawing with. It is available in the 3D Viewport regardless of mode, but is most relevant
when drawing.
You may have to bind “3” yourself:
If you want the “3” key to open the Change Active Layer popup:
Open Edit → Preferences → Keymap
Search for
gpencil.layer_set_activeClick + Add New
Set key to 3
Save preferences
Secondary Keybinds
These keybinds are used less frequently but are important for specific tasks.
Editing & Utility Keys
Shortcut |
Action |
Context |
Operator ID/Tool |
Keymap Section Path |
|---|---|---|---|---|
|
Toggle Draw ↔ Edit Mode |
3D Viewport > Any Mode |
|
Window |
|
Trim selected strokes |
3D Viewport > Edit Mode |
|
3D View → 3D View (Global) |
|
Smooth selected strokes (press repeatedly) |
3D Viewport > Edit Mode |
|
Grease Pencil → Stroke Edit Mode |
|
Send to Back (z-order) |
3D Viewport > Edit Mode |
(Blender native) |
Grease Pencil → Stroke Edit Mode |
|
Send to Front (z-order) |
3D Viewport > Edit Mode |
(Blender native) |
Grease Pencil → Stroke Edit Mode |
|
Toggle sculpt selection mode (all vs selected only) |
3D Viewport > Sculpt Mode/Edit Mode |
(Blender native) |
Sculpt → Sculpt (Global) |
|
Apply Material & Stroke to Active Selected Object |
3D Viewport > Edit Mode |
|
Grease Pencil → Stroke Paint Mode |
|
Toggle realtime compositor in EEVEE |
3D Viewport > Any Mode |
|
3D View → 3D View (Global) |
|
Simplify Stroke |
3D Viewport > Edit Mode |
3D View → 3D View (Global) |
About the C Key (Blender’s Trimmer)
C is bound to Blender’s native Trim operator (grease_pencil.trim).
It requires Draw Mode (Tab). In Draw Mode, select two overlapping strokes and press C. Trim cuts each
stroke at their first intersection point, removing the excess portions. This will appear to ‘connect’ them there,
and, at least for the purposes of fills, does. Just not _actually_ as a stroke. Strokes only have two ends.
C was remapped from Ctrl because Ctrl conflicts with other tool shortcuts. If Ctrl is set to
toggle trim mode, any Ctrl-based shortcut would put you in trim mode before registering the rest of the keys.
Setting C as a dedicated trim key avoids this.
Fred’s Tip
“I just couldn’t find a way to use Ctrl-Left Mouse while holding it down. You have to set Ctrl to just toggle to trim mode, so if you try to do any other ctrl-based shortcuts, it puts in trim mode before hitting the rest of the keys, really annoying.”
In Blender 4.1.1 this auto-smoothed the join; in 5.x it does not (see Alt+F below).
About Alt+F (Join & Smooth)
In GP3, connecting strokes with C no longer auto-smooths the join. Additionally, the joined strokes don’t stay selected after connecting (unlike Blender 4.1.1). The workflow is now:
Select two unconnected strokes in Edit Mode.
Press C to connect them.
Re-select the joined area (5.x deselects after connecting).
Press Alt+F repeatedly (a few times) to smooth the join.
See Alt+F Doesn’t Auto-Smooth in Troubleshooting.
Technical note about Alt+F
Alt+F calls Fred’s gp.join_and_smooth operator, which internally uses
Blender’s native Join operator (grease_pencil.join_selection with
JOINSTROKES type) followed by stroke_smooth. This is distinct from
Trim (C key), which cuts strokes at intersection points.
C (Trim): Cuts strokes at where they cross — native Blender tool
Alt+F (Join & Smooth): Connects stroke endpoints + smooths — Fred’s custom operator
Workflow for connecting strokes:
Select two unconnected strokes in Edit Mode.
Press Alt+F to join and smooth them in one step.
Press Alt+F repeatedly for additional smoothing.
Unlike Trim, Join does NOT require strokes to overlap — it connects the nearest endpoints.
About Ctrl+Shift+R (Selection Mode Toggle)
While in Sculpt Mode (held via Alt), this toggles whether the sculpt brush affects all strokes
or only selected strokes:
- Selected Only (default): You will see gray edit lines while nudging. Only strokes you’ve explicitly
selected will be affected.
All Strokes: No edit lines appear while nudging. Everything is affected.
You must be in Sculpt Mode for this toggle to work. If nudging seems “locked” and nothing happens, you’re
likely in Selected Only mode but haven’t selected anything — either select strokes first, or toggle to All
Strokes mode with Ctrl+Shift+R.
Advanced Configuration
These sections cover unbound operators, v1.0 substitutions, and platform-specific considerations.
Unbound Operators (Available but Not Yet Assigned)
These operators exist in the v2.0 code but may not have keybinds in the default keymap file. You can bind these yourself if you find them useful:
Note
gp.apply_material_and_stroke is the only operator in v2.0 with Blender undo support
(bl_options = {'REGISTER', 'UNDO'}). Other operators use manual undo_push() calls. This can
potentially affect the exact moment Blender ‘undo’s to, so let us know if that aspect could be improved
as you encounter things with it.
Native Blender Substitutes (v1.0 Features Now Handled by Blender)
Old v1.0 Operator |
Replacement |
How to Access |
|---|---|---|
|
Noise Modifier |
Modifiers tab → Add Modifier → Effect → Noise. Adjust Strength, Scale, Jitter, Seed. Non-destructive, keyframable. |
|
Viewport Overlays |
Click Overlays button (top-right of 3D View) → check/uncheck Onion Skinning. Per-layer control via eye icon in layer list. Advanced settings in N-panel Onion Skinning panel. |
|
Vertex Colors deletion |
Object Data Properties (green triangle) → Vertex Colors panel → click X on color layer. Or Vertex Paint mode → Clear brush. |
|
Native smooth or |
Edit Mode → select stroke → F3 → search “stroke smooth”. Or use Alt+F (Join & Smooth). |
|
Brush Strength operators |
Use |
Pen Pressure & Brush Strength
Note
The v1.0 pen pressure toggle operator (fred.op29) is not present in v2.0.
There is no dedicated pen pressure toggle operator in the current codebase.
To simulate pressure on/off behavior, use the brush strength operators:
``gp.draw_brush_strength_full`` — Sets “MY STROKE” brush strength to 100%
``gp.draw_brush_strength_none`` — Sets “MY STROKE” brush strength to 0%
These are currently set to (plain) 2 and 1 respectively.
Fred’s Tip
If you experience pen pressure glitches (lines behaving incorrectly), restart Blender and/or your tablet driver. Drawing with a mouse should work fine [as a test] — if it doesn’t, [then] the issue is in the script or setup, not the tablet driver.
You can artificially grow points with stroke thickness until it looks like there’s pen pressure, but it’s artificial.
Choosing the Right Keymap Context
When binding any operators to keys, the Keymap Context determines when the shortcut is active. If you’re in the wrong context, the key won’t respond.
- 3D Viewport: Works in the 3D Viewport. Signifies operators
that switch modes internally (like sculpt isolation) or work across modes (like navigation).
- Paint Mode: Specific to drawing and brush-specific
tools (Eraser swap, Stroke Strength).
- Edit Mode: Only active while in Edit Mode. Use for tools that
require selected strokes (Join & Smooth).
Note
The modal toggle operators (
gp.auto_merge_on/gp.auto_merge_off,gp.draw_behind_on/gp.draw_behind_off,gp.sculpt_mode_on/gp.sculpt_mode_off) must be bound in Grease Pencil → Stroke Paint Mode, not 3D View (Global). If bound to the wrong context, the key press will be ignored while drawing.
Non-US Keyboard Layouts
- Italian/German layouts: The grave accent (or
~key) for timeline centering may map to a differentphysical key. Users report success remapping to
Homeor bracket keys.
- Ubuntu Studio: The
Alt+~combination may be intercepted by the desktop environment. Disable inSystem Settings → Keyboard → Shortcuts.
Dual Rotation Binding (Accessibility Feature)
Rex’s keymap binds view rotation to both Middle Mouse and Ctrl+Alt+LMB for tablet/trackpad users.
This is intentional and compatible with MMD navigation schemes.
Workflow Tips
Check Three Things When Something Goes Wrong
When switching tasks, always check these three settings:
Layer — Is the correct layer active?
Tool — Is it Draw, Fill, or Sculpt?
Material — Is the correct material selected?
Drawing Behind: When to Use It
Hold B while drawing to place strokes behind existing artwork on that layer. This is essential when drawing the lower jaw/muzzle area of a side-facing character — the bottom of the muzzle should render behind the top.
Remember: press and hold B before starting your stroke, and release B only after lifting your pen. If you let go of B mid-stroke, the toggle will hang. See Modal Toggles.
Pupils: Draw on the Line Layer with Fill Material
Instead of drawing pupil lines on the line layer and then filling them on a separate fill layer (which means you have to move two objects on two layers later), draw the pupils directly on the line layer using the black fill material (slot 2). This creates a single stroke that has both stroke and fill, making it trivial to move later.
Shift 3 → eye line layer.
4 → material menu → select black fill (slot 2).
Draw pupil as a single circle.
This technique applies to noses, goatees, eyebrows — anything that’s a simple shape where you’d otherwise have to manage line + fill separately across two layers.
Crossing Strokes to Prevent Fill Gaps
When drawing outlines that will be filled, cross your strokes over at least halfway so they overlap. This prevents gaps that cause “unable to fill” errors. Build this into muscle memory and you’ll rarely need to adjust gap closure settings.
Thicker lines naturally reduce gap issues because the fill tool accounts for stroke thickness.
Material Efficiency
Remember that changing a material in a slot updates every frame using that slot. To change a color globally, edit the material in the slot rather than refilling any frames.
Optimizing File Size
If your file becomes too large due to too many vertices:
Select all strokes (or use Multi-Frame Editing) in Edit Mode.
Press Ctrl-A or search for “Adaptive” or “Simplify Stroke”
Set the threshold (e.g.,
0.001) to simplify strokes.
You can optionally switch to another mode after selecting.
Layer Order Matters
Always keep Fill layers UNDER their corresponding Line layers in the Outliner. If fills are above lines, they’ll render on top and obscure your line art.
- To reorder:
Page Up / Page Down (note: Page Down is buggy in 5.2 — move layers individually)
Right-click layer → Move to Top/Bottom
Use arrow buttons in the layer properties panel
Keybinding Next Steps
Once you’ve got your keybinds done, head to AFIS Workflow Guide to learn the daily workflow and practice with the provided scene files.
View the The Violence Tool — Keybind Cheat Sheet - This markdown document is also available as a file in the Grease Pencil channel.
Back to Blender Basics if you are new to Blender in general.
Process Documentation explains how-tos by user goal ‘step’ instead.
Troubleshooting & Known Issues is a collection of symptom-based help.